Tag Archives: fruit: strawberries

Jubilee Tart & Banoffee Cupcakes

9 Jun

Where has this week gone? I was supposed to write this post on Monday, but the days have just slipped away!  I’m on ‘half term’ at the moment, which is British for ‘a whole week off from work in the middle of the school term’, and I’m not complaining one bit. Half term coincided with the Queen’s Diamond Jubilee, which for all you non-Commonwealth folk is the 60th anniversary of Queen Elizabeth II’s accession to the throne. You could hardly walk out your front door here in England without seeing Union Jack flags, bunting, and blue, white and red balloons waving in the breeze. The Husband and I were invited to a Jubilee barbeque/party on Sunday afternoon, and I thought I’d get in on the Jubilee action and make some Union Jack-inspired treats myself.

I was in an enormous hurry while I was baking these, mainly because *cough*I-forgot-to-buy-eggs-and-had-to-run-back-to-the-supermarket-halfway-through*cough*, so by the time I was back I was majorly running out of time to get everything done. I ended up using store-bought pastry (come on, you’ve done it too) and a tin of ready-made caramel filling for the cupcakes, because I didn’t have time to deal with making the caramel and waiting for it to cool down. Nevertheless, we got there in the end!

I decided on Banoffee cupcakes because I figured I should do something quintessentially British, and I was relatively sure that people would have eaten their way through enough Victoria sponge cakes already. Banoffee pie was supposedly created in East Sussex (which is actually where The Husband and I currently live), so it fit the bill perfectly! It’s a gorgeous mix of banana and toffee, and I was really excited to put it into cupcake form. Plus, I’d bought this ridiculously adorable cupcake decorating set the previous week, which I was desperate to use:

First up, let’s look at the Jubilee Tart. I saw this on the cover of a magazine at my local supermarket and I couldn’t resist! The recipe is ridiculously quick and easy (especially if you use ready-made pastry) and the tart itself is light, fresh and fruity. Yum!

JUBILEE TART

1 sheet shortcrust pastry

375g mascarpone cheese

225g low fat creme fraiche (or sour cream, if you can’t find creme fraiche)

1/2 teaspoon vanilla extract

2 – 3 tablespoons icing sugar

400g strawberries, hulled

150g raspberries

300g blueberries

1. Place the sheet of shortcrust pastry, lightly pricked all over with a fork, on a baking tray lined with baking paper and bake in a preheated oven at 190 degrees Celsius (375 degrees Fahrenheit or Gas Mark 5) for 15 – 18 minutes, until cooked and light, golden brown in colour.

2. Remove the pastry from the oven and allow to cool.

3. Meanwhile, whisk together the mascarpone and the creme fraiche until smooth and combined. Add the vanilla extract and the icing sugar (start with 2 tablespoons and taste it before adding a third!) and whisk to combine.

4. Dollop heaped spoonfuls of the mascarpone mixture onto the cooled pastry and spread it out with a spatula, leaving a 1 – 2 cm gap around the edge.

5. Arrange the berries into the shape of a Union Jack: use the strawberries for the centre cross, raspberries for the smaller arms and blueberries for the blue background.

6. Enjoy!

And now for the Banoffee! The banana cupcake recipe is a slight variation on the one from the lovely Marian Keyes’ Saved by Cake, and the cream cheese frosting recipe is my usual one.

BANOFFEE CUPCAKES

125g butter, softened

125g caster sugar

125g self raising flour

2 eggs, lightly beaten

4 – 5 ripe bananas, mashed

1 x 397g tin of ready-made caramel/dulce de leche

1. Preheat the oven to 170 degrees Celsius (325 degrees Fahrenheit or Gas Mark 3) and line a muffin/cupcake tray with 12 cupcake papers.

2. In a large mixing bowl, cream the butter and the caster sugar together until they’re fluffy and light in colour.

3. Add the beaten eggs and mix well to combine.

4. Add the mashed bananas to the mixture and mix gently.

5. Add the sifted flour and fold into the mixture.

6. Spoon the mixture into the prepared cupcake cases and bake in the oven for 20 – 25 minutes (the banana seems to make the cakes take a bit longer to cook!), checking after 15 minutes and removing when the cupcakes are lightly golden in colour and a skewer inserted into the centre comes out clean.

7.  Once the cupcakes are cooked and having completely cooled, you need to hollow them out to fill them with caramel.

8. Take a sharp paring knife and cut a cone-shaped circle out of the middle of each of your cupcakes.

9. Place a dollop of caramel into the hole.

10. Replace the top of the cupcake so that it acts like a lid to hold the caramel in.

CREAM CHEESE FROSTING

125g butter, softened

225g cream cheese

1 teaspoon vanilla extract

5 cups icing sugar

1. Using a stand mixer or electric beaters, beat the butter and cream cheese on high speed for 3 – 4 minutes, until light, fluffy and combined.

2. Add the vanilla and half of the sifted icing sugar and beat for 2 – 3 minutes, until light and fluffy.

3. Add the remaining sifted icing sugar and beat again for 2 – 3 minutes.

4. Place the frosting into a piping bag and attach a large, open star tip. Pipe swirls of frosting onto your cupcakes and decorate however you like. I added some red, white and blue sprinkles and used the cupcake toppers from my decorating kit.

5. Enjoy!

Vanilla Cupcakes with Strawberry Buttercream

14 Feb

A few days ago, I got a very exciting package in the post. It was enormous, and I couldn’t figure out what it was – it was addressed to me and came in a big box from Amazon UK, which was all fine…except that I hadn’t ordered anything. I opened it up, though, and sitting on top was a note…


…and inside was this little beauty.


I officially have the most amazing dad in the whole world! No offence to your dad, though. I’m sure he’s completely lovely, too.

I was honestly far too excited to wait to use it, so I had to find an excuse to bake. And what better excuse is there than Valentine’s Day? I ended up making a small batch (12 cupcakes instead of the usual 24) and gave six of them to my mother-in-law to take into work to give to her team today, and left six at home for The Husband to eat at his leisure.

Before we get cracking with the recipe, though, there’s something I need to confess. I got a little bit ahead of myself and was inspired by this wonderful post on Alison’s Wonder Scraporium, which I was desperate to try; I mean, what could be more perfect for Valentine’s Day cupcakes than finding a heart inside the cupcake?

I really should have followed Alison’s instructions more carefully, though. I forgot to buy red food colouring (I only got pink, as I knew I wanted to do pink frosting), and that was a huge rookie mistake. Pink is all well and good when you’re doing frostings and light coloured cakes, but once the cake is baked it’s really difficult to get that depth of colour that red brings. The pink tends to fade a bit in the oven, so although you might get a lovely coloured buttercream, pink coloured hearts baked inside vanilla cupcakes very quickly become almost totally invisible. Bah, humbug.

Nevertheless, we can learn from my bad decision making skills, and next time we’ll get it perfectly right. As long as you use red food colouring for the hearts and add enough of the colour to get a very strong, deep shade before baking, then it should work an absolute treat. Winner!

I’ve included pictures of my botched heart attempt, but other than that slight devastation, the cupcakes turned out wonderfully. This is my absolute favourite vanilla cupcake recipe in my own words and VERY slightly modified (it comes from the ever-amazing The Crabapple Bakery Cupcake Cookbook – if you don’t have it, you have to get it. It’s worth absolutely every penny!), which I’ve teamed with my modified version of the same book’s vanilla buttercream to create a strawberry frosting instead.

The cupcakes are light, fluffy and packed with vanilla, while the frosting is smooth, creamy and bursting with strawberry flavour. The perfect Valentine’s Day treat! Happy baking!


VANILLA CUPCAKES WITH STRAWBERRY BUTTERCREAM

These are dedicated, of course, to my wonderful husband – thank you for everything. I love you.

VANILLA CUPCAKES

2 3/4 cups plain flour

2 teaspoons baking powder

200g softened butter

1 3/4 cups castor sugar

5 eggs (or 4, if you’re using especially large ones)

1 tablespoon vanilla extract

2 teaspoons strawberry essence

Pink food colouring (red, though, if you don’t want it to fail like mine did!)

1 cup milk

Firstly, preheat your oven to 170 degrees Celsius (that’s 340 degrees Fahrenheit or Gas Mark 3 – 4), line a 12 hole muffin tray with cupcake papers and grease a non-stick a 20cm round cake pan.

In a separate bowl, sift together the flour and baking powder and set it aside.

Then, in a large bowl (or the bowl attachment of your stand mixer), cream the butter for 2 minutes on high speed.

Add the castor sugar 1/3 at a time, beating on high for 2 -3 minutes after each addition. Once all the castor sugar is in, beat the mixture on high speed for at least 2 minutes, until the sugar has almost totally dissolved. Then add the eggs one at a time, beating well after each addition until the mixture hits a light and fluffy consistency. Now add the vanilla extract and beat thoroughly.

Pour 1/3 of the sifted flour in the butter mixture and mix together using the lowest possible speed until just combined.

Then add 1/2 of the milk and continue to mix together on low speed until just combined. Repeat this, making sure that the last ingredient you add is the flour and that the mixture is smooth. It’s really important to not to overbeat during this stage – you’ll end up with dense, tough cupcakes if you do!

Now’s the time that we deviate from the regular recipe. Grab a separate bowl and spoon around 1/2 of the cupcake mixture into it, and set the bowl aside. With the mixture that’s left in the original mixer bowl, add the strawberry essence and the food colouring and beat on low speed until combined and the food colouring is evenly distributed.

Pour the coloured batter into the greased cake pan and bake in the oven for 20 minutes, until the cake is coming away from the sides of the pan and a skewer inserted into the centre comes out clean.

Once you’ve pulled out the coloured cake, leave it to cool (I won’t lie, I jammed it in the freezer for 10 minutes to cool it down faster because I have literally no patience). Once cooled, remove it from the cake pan and set about cutting little hearts out of the cake, small enough to fit inside a cupcake. If you’re super-organised then you probably have a tiny little heart-shaped cookie cutter, so use that. If you’re disorganised like me, you’ll have to cut them out yourself. I used a small, sharp knife and just cut them freehand – they’re obviously all slightly different because of that, but never mind!

Once you’ve cut out your hearts (and yes, I did cut out too many – I kept trying to get them as perfect as possible, so I ended up with extras!), spoon a heaped tablespoon of the plain vanilla cupcake mixture into the bottom of each cupcake paper. Then gently press a heart into the middle of each, so that the hearts are standing upright.

Very carefully spoon enough cupcake mixture over the top of the hearts to cover them.

Place the cupcakes in the oven and bake for 20 minutes (but start checking after 15 in case your oven runs hot!). The cupcakes are done once they’re springy to touch and a skewer inserted comes out clean.

Cool to room temperature before frosting.

STRAWBERRY BUTTERCREAM

8 cups icing sugar, sifted

200g salted butter

1/2 cup milk

2 tablespoons strawberry essence

Pink food colouring

Cream the butter on high speed for 2 -3 minutes until light and fluffy.

Then add the milk, strawberry essence and half of the sifted icing sugar and beat, starting on low speed until the sugar is just combined and then turning it up to high speed for 4 -5 minutes until the mixture is light and fluffy and the sugar has almost completely dissolved.

Add the remaining sugar and beat again for 3 -4 minutes until the frosting is soft, fluffy and spreadable. Add a bit more milk if it’s too dry, or a bit more icing sugar if it’s too runny.

Now add the food colouring a little at a time, beating between each addition until you get the shade of pink that you want.

Frost the cupcakes using your favourite piping tip (I used a big open star tip, about twice the size of Wilton’s 1M) and decorate however you like – I used white and pink sprinkles and white chocolate hearts.

And here’s a picture of the failed hearts. Boo!

Enjoy, and happy Valentine’s Day!

Lemon & Passionfruit Sponge Cake

14 Jan

It’s my lovely friend Sarah’s birthday on Monday, and tonight we’re all going out to dinner as a group to celebrate by eating our body weights in dumplings. We’ll be heading home for dessert, though, so I figured a birthday cake might be in order.

I was a little slow off the mark today. I meant to be impressively organised and wake up early to have the cake baked and decorated by lunch time.

This did not happen.

I ended up sleeping through my alarm and racing around to the supermarket at 11:30am in a mad dash for ingredients. I wasn’t home until almost half past twelve, and by the time I’d unpacked all the shopping bags and turned the ovens on to preheat, it was creeping up towards 1pm. Argh!

The result is that I didn’t have as much time as I would have liked to decorate, and so the icing isn’t as smooth as I’d like and I didn’t spend enough time getting everything to sit perfectly. Never mind, though – I think it’ll still taste pretty good!

I got the recipe out of my favourite recipe book, The Crabapple Bakery Cupcake Cookbook. Jennifer Graham’s recipes are generally so good that there’s no need to change a thing, so here’s how I did it in my own words…

LEMON & PASSIONFRUIT SPONGE CAKE

6 eggs

1 cup caster sugar

1/2 cup self raising flour

1/2 cup plain flour

1/4 cup custard powder

1/4 cup cornflour

1. Firstly, preheat the oven to 170 degrees Celsius (that’s 340 Fahrenheit) and grease and line three 20cm (8 inch) cake pans.

2. Crack the eggs into a large mixing bowl and beat on a medium speed for 2 minutes.

Crank the speed up to full power and beat for 15 – 20 minutes until the eggs have become thick and fluffy.

3. Add the sugar gradually in 3 lots, beating for 2 minutes after each addition to allow the sugar to dissolve. Beat on high for a further 10 minutes once all the sugar is in to allow the egg mixture to become thick and fluffy.

4. Mix together the flours, custard powder and cornflour by sifting together three times. Gently fold into the egg mixture until just combined, making sure that all the flour pockets are gone.

5. Evenly divide the mixture between the three cake pans and bake for 18 – 20 minutes, until lightly coloured.

6. Remove from the oven and remove the cakes from their pans immediately and allow to cool for around half an hour before decorating.

Meanwhile, as the cakes are baking and cooling, you can whip the cream and get on with the rest…

LEMON CURD FILLING

4 egg yolks

½ cup sugar

1 tablespoon lemon zest

85 ml lemon juice

½ teaspoon lemon essence

70g butter, cubed

1. In a medium saucepan, whisk together egg yolks, lemon zest, juice and essence and sugar over a low-medium heat until combined. Stir constantly until the mixture has thickened and is starting to simmer.

2. Turn off the heat and add the butter, one cube at a time, stirring to melt and combine.

3. Place in the fridge until cold and firm.

PASSIONFRUIT SAUCE

2/3 cup passionfruit pulp

¼ cup orange juice

1 ½ tablespoons caster sugar

3 teaspoons cornflour

2 tablespoons water

1. Mix the passionfruit, sugar and orange juice together in a medium sized saucepan and place over a low-medium heat. In a cup, combine the cornflour and water, stirring until smooth.

2. Add the cornflour mixture into the saucepan and stir continuously over the heat until thick and simmering.

3. Remove from the heat and place in the fridge to cool.

PASSIONFRUIT FROSTING

50g butter, softened

½ cup passionfruit pulp

4 cups icing sugar4

1. Make sure the butter is very soft, then add the passionfruit and half of the sifted icing sugar. Beat well by hand until smooth.

2. Add in the remaining sifted icing sugar and continue to beat by hand until thick and smooth. It should be easy to spread.

DECORATING

1. Once the cakes are cooled, place one on a plate and pipe large whipped cream rosettes around the outside edge.

2. Place a heaped tablespoon of lemon curd filling into the middle of the cake and gently spread towards the whipped cream rosette border.

3. Pipe more whipped cream rosettes on top of the lemon curd to cover.

4. Gently spoon some of the Passionfruit Sauce over the centre rosettes.

5. Place another sponge cake gently on top and repeat the process.

6. Then place the third cake on top and gently spread with passionfruit frosting, allowing the frosting to drip over the edge and down the sides of the cake.

7. Sprinkle with coloured cachous and gently press lilies (or a flower of your choice) into the top of the cake.

8. Press halved strawberries into the gaps between the cream rosettes on each layer of the cake.

Enjoy!

Happy 24th birthday, Sarah! xxx

Baked Berry Cheesecake

8 Dec

Last weekend, The Husband and I had ten people over for dinner as a last hurrah for our house sitting stint at my dad’s place. We got everyone to bring a dish with them for dinner – a sort of potluck arrangement – and we were in charge of dessert. Two nights earlier we’d watched a rerun of an episode from Nigella Lawson’s Kitchen series and The Husband (being completely smitten with Nigella, obviously) set his heart on us making her Chocolate Peanut Butter Cheesecake.

It was all settled (and I’m still not totally sure how it happened) but at some point while we were writing up our shopping list for the ingredients, The Husband’s casual suggestion of ‘hey, how awesome would it be if we made TWO cheesecakes?’ suddenly became the plan of action.

I didn’t really fancy making two of the same (because that would make my life far too easy, right?), so I decided to wing it and just make up my own baked cheesecake featuring berries…pretty much because we had strawberries in the fridge and frozen raspberries in the freezer.

And that, my friends, is how we ended up with two baked cheesecakes hurriedly prepared in the space of one afternoon.

The Nigella Chocolate Peanut Butter Cheesecake can be found here, but here is the lovely new…

BAKED BERRY CHEESECAKE

200g Digestive biscuits (though similar plain biscuits would do)

150g butter, melted

375g cream cheese

1/2 cup caster sugar

1 tablespoon vanilla extract

2 eggs

3 tablespoons plain flour

200ml sour cream

1/2 cup roughly chopped strawberries, washed and hulled

1 cup frozen raspberries

Preheat the oven to 160 degrees Celsius (325 Fahrenheit or Gas Mark 3) and line a 20cm (8 inch) round springform pan with greaseproof baking paper.

Place Digestive biscuits in the food processor and process until finely crushed. Add the butter and process again until well combined. The biscuit mixture should feel slightly damp and should press together and hold easily when pressed down with your fingertips. If it appears too dry, add a little more butter (20g at a time) until it reaches the desired consistency. Pour the biscuit mixture into the lined pan and press down firmly with your fingertips, spreading the mixture to cover the base of the pan. Bake in the oven for 10 – 12 minutes.

In the meantime, beat the cream cheese, sugar and vanilla extract with an electric mixer to combine. Beat in the flour and then add the eggs one at a time, beating well after each addition. Beat in the sour cream until just combined.

Using a wooden spoon, gently fold the strawberries and 2/3 of the frozen raspberries into the batter.

Pour the batter over the base and then gently drop the remaining frozen raspberries evenly over the surface of the mixture.

Bake for 50 minutes (though start checking after 40). The cheesecake is ready when the top is firm and there is a slight wobble in the middle of the cake.

Technically, you ought to let it cool in the oven with the door left ajar for an hour or so to prevent the top from cracking, and then transfer it to the fridge to finishing cooling. Honestly, though, I was in such a rush to get this finished (I pulled it out of the oven ten minutes before our friends arrived) that I let it cool for 20 minutes out of the oven before chucking it in the fridge to get cold. The top cracked (unsurprisingly!), but really…who cares? It tasted absolutely gorgeous, and I’m happy enough with that!

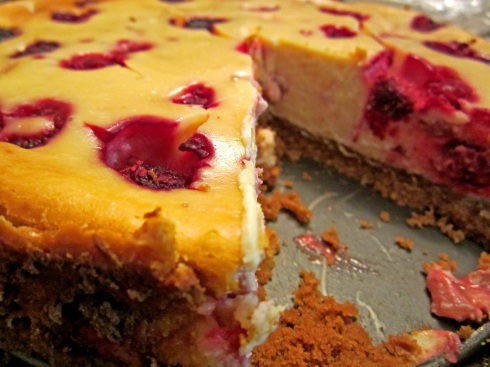
I must apologise for my dodgy photography – it was hard enough to snap a picture before it was devoured completely! You get the idea, though.

Let’s face it; this is by no means the most aesthetically pleasing cheesecake in the world. The top is cracked and the colour could certainly be more vibrant…but honestly? The flavour is ridiculously gorgeous, so it’s easy to overlook the outward imperfections.

The rich, buttery base is beautifully complemented by the smooth, creamy filling studded with sweet strawberries and the slight sharpness of the raspberries. This is the perfect summer dessert – deliciously decadent while still having a fruity kick. Though realistically, is there ever a bad time of year for cheesecake? I think not…